Here in the Mid-Atlantic, we're not even halfway through winter but we have already had more than our share of snow and cold weather. Few things are as frustrating as having the motivation to train but not being able to get outside. Even if you don't mind the indoor trainer, it's tough to do many long endurance rides indoors. If you don't want to just "sit it out" and resign yourself to a few months exclusively on the indoor trainer, here are some tips on how to prepare yourself.
A few years ago, I wrote an article for Cadence where I detailed the process of how to get your training in when the weather is working against you. This is a general strategy for getting through the winter, but I thought that I would elaborate on #2: Invest in some good winter gear.
On a day to day basis, here is the process I follow in order to figure out what to wear:
Step 1: Check the weather forecast. Weather.com has a nice site that will spell it out for you hour by hour. Obviously you will want to pay attention to the temperature, but you should also look at the wind strength and direction. One of the biggest mistakes new cyclists make when trying to ride outdoors in the winter is they underestimate the wind factor. A lot of cold weather gear that is not cycling specific may keep you warm enough for a snowball fight but not warm enough to ride a bike. Even if you there is no wind, there will still be a "wind chill" at least equal to the speed you are traveling. If it's really windy, you will have to take the "feels like" temperature into account and you may want to wear some clothing with more windblock material, which tends to do a good job of keeping you warm, though it is not particularly flexible or wicking. Now some astute readers may question why the wind direction matters unless you are riding in one direction and then getting a ride home. In truth though, a lot can be done with route planning in order to avoid the worst of the headwind (which can be demoralizing as well as chilling). For example, the other day I saw that there was a steady 17-20 mph wind coming from the west, so I decided to do this route, where I would more protected from the headwind on the way out by hills and trees and then have a tailwind for the second half when I would surely be more tired.
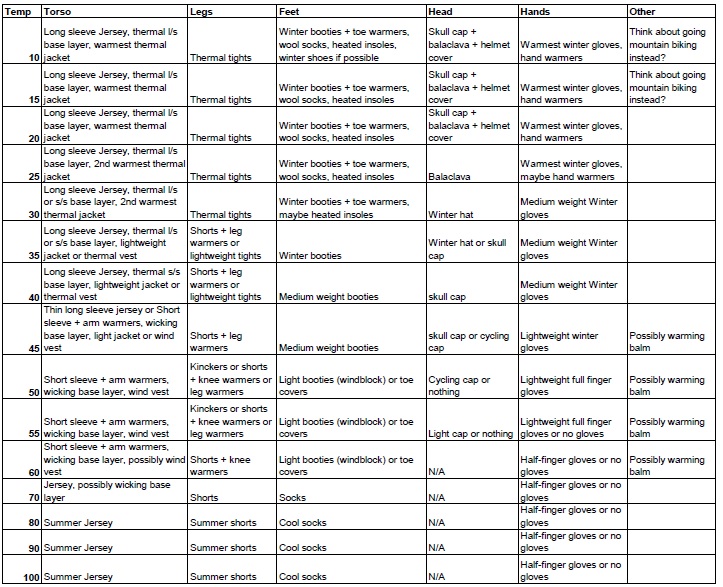
This is my personal clothing matrix. Keep in mind that this will include my own biases, but it is a good starting point.
Step 2: Check the clothing matrix. I made up this matrix after years of trial and error as well as more pairs of gloves, booties, jackets, base layers and hats than I can imagine. Keep in mind that this is only a starting point and also that it is based on my personal preferences and biases. Also, you may not have all the clothes I have so you may need to make some substitutions. BTW, if you don't like my chart, you may also want to try this one from Bicycling Magazine.
Knee and leg warmers are nice because they are easy to take off during a ride if it gets warmer
Step 3: Adjust for weather changes. If there are strong winds, you should take a look at the "wind chill" or "feels like" temperature as well as the actual temperature. Anything over 5 mph winds will be significant. You should follow the recommendations for 5 degrees cooler on any areas of exposed skin. If it is going to warm up a lot during your ride, you should take extra care to bring some clothing alternatives in your pockets or possibly just be prepared to be cold at the start before you warm up. As a rule it is usually good to start cold weather rides a little bit cold and then warm up. If you are too comfortable at the very start, chances are that you will be sweating like crazy in an hour, and then freezing cold in 2 hours because you are soaking wet with sweat.
You should look not only at the temperature when you are leaving but the temperature throughout your ride. If your ride starts at 8-10 AM, it is not unusual that the temperature could rise more than 10 degrees in an hour. If it's going to be a particularly hard/fast ride, you may be willing to sacrifice your comfort in the beginning of the ride so you don't have to bring as much with you or be sweat logged after an hour.
Different head covering options
Step 4: Adjust for the type of ride. In general, the harder you will be going, the warmer you will be and therefore the less you should wear. For example, if you are going for an easy recovery ride, you aren't going to warm up as much as you would for a sprint or anaerobic capacity workout. The other thing to keep in mind is how much protection from the wind and elements you will have. Riding around flat fields or ocean front will be a lot colder than rolling hills or forests, even if all other things are equal. In fact, many riders will choose to ride their mountain bikes on those really cold days because of lower speeds as well as more wind cover. It should be noted that these recommendations are for road and mountain bikers will have to follow slightly different rules (mainly with regard to foot covering since booties don't usually fit well on MTB shoes). Finally, riding in a group can offer a lot of protection from the wind, though if you are riding on wet roads you will end up with more ice water in your body and face if the other riders aren't using fenders.
As you can see, I have lots of different glove options because I often have issues with cold hands
My feet also get very cold so I like to have a lot of choices
Step 5: Adjust for your personal preferences or needs. Personally, I have always had trouble with cold hands and feet, and to this day I have never found a perfect solution for keeping either hands or feet warm in the coldest conditions, even if I follow all of my own recommendations. Yet I know other people that ride on the coldest days with only light booties and gloves. A rider with an artificial hip may need to take added precautions in very cold weather, and a rider with a knee issue may need to either keep the knee covered even when it is fairly warm or uncovered when it is fairly cold depending on the nature of the injury. Some riders are very sensitive to their ears being cold, so they have to wear a hat or headband that covers their ears even when most people would go bare-headed (except for a helmet of course). Additionally, some people may find certain accessories such as neck warmers, hand warmer packets, multiple pairs of socks or booties, heated insoles, rain pants and fenders cumbersome, annoying and possibly unfashionable. You know yourself better than anyone, so adjust according to your own preferences.
Step 6: Make notes on your training log about what you wore and how comfortable you were. Though most people won't want to bother with another thing to record in their training log, it can help to record the weather conditions, what you wore and how comfortable you were so you can better learn from your mistakes. In addition, you can never have too many clothing options and no clothing is ever perfect. Always be open to trying out new products and technologies. In addition, clothing wears out and breaks so it's always good to have backup.
Now, everyone has their limits. I admit, when I lived in Ohio I used to ride as long as it was above 10 degrees. In my old age, that limit has been raised to 20 degrees but it still feels pretty cold. Luckily, I have learned a few tricks that help make things a little more bearable in the extreme cold.
Toe Warmers + Booties: For added toe protection, you can double up by wearing toe warmers underneath your regular winter booties. I even sewed (ok, my wife sewed) an old pair that was torn up onto the outside of a pair of winter booties.
Heated Insoles: There are a number of battery operated or rechargeable electric insoles that you can get. Most of these are designed for skiers, who often ski in far more extreme conditions than we rides in. There are a few potential issues with these though: a) The wires are often very delicate, requiring that you carefully route them through your shoes so they don't get damaged, b) The controls have to be mounted externally (most likely somewhere along your calf) so you have to think about where you put them so they won't be in the way and keep them from getting damaged, c) Most of these don't last more than 100 charges (though if you are like me you would probably only have occasion to use them about 10 times/year), d) You will usually have to remove your regular insoles and replace them with these, which can be a fit problem for people that have to wear special orthodics or insoles with high arch support d) They can be relatively expensive. For those looking for a less expensive, but slightly effective solution, you might want to look at disposable heated insoles as an alternative.
Winter Shoes: Many cycling shoe manufacturers make special "winter cycling shoes" that are thicker, more waterproof, more windproof, less ventilated and offer more insulation inside. Personally, my experience with these is that they are indispensable for winter mountain biking, but not really worth it for the road. The reason they are so nice for mountain biking is because it is so difficult to get good booties for mountain biking and even the MTB specific booties have a habit of slipping off or shredding whenever you put your feet down. Most people find that riding with them on the road gives you a little bit more warmth in exchange for a lot of extra problems. Shoes are arguably the most important item of a bike fit and any move away from what you normally use can cause huge problems (which is why most professional cycling teams allow riders to use non-sponsored shoes). There may even be a significant difference required in saddle height when switching from one shoe to another, even if you keep your brand consistent.
Take your gloves off on the climbs: Personally, I am partial to Lobster gloves in very cold conditions. My warmest pair of gloves is a purple and blue pair of down insulated Pearl Izumi gloves lobster gloves from 1994. They are super ugly and bulky, but they are warmer than anything I have ever found, so for someone that gets cold hands easily, they are worth it. The other nice thing about lobster gloves is that it's easy to stick hand warmer packs in there if you need to. The only problem is that my hands always sweat in them and if that sweat becomes excessive my hands will get cold because of this. A good way to fix this is to take off your gloves on the climbs, letting everything dry out. Because the speed is low, your hands won't get too cold. Once you reach the top, put your gloves back on before your speed picks up again and you should be fine.
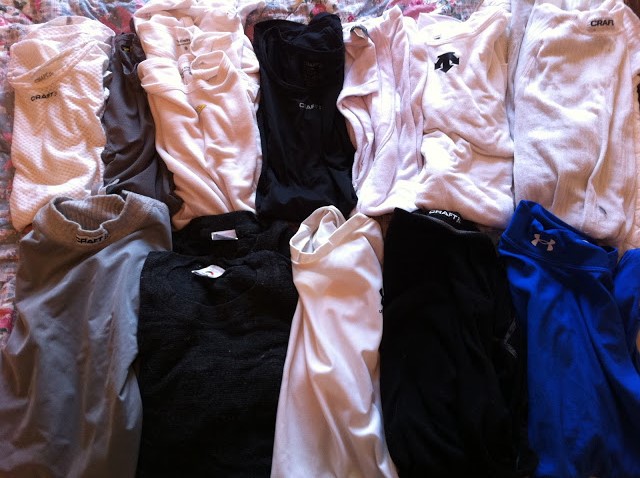
All sorts of base layer options: short sleeve, long sleeve, sleeveless, thermal, wicking, warm weather...
Merino wool baselayers: Thin merino wool has the distinctive characteristic of keeping you warm in cold and wet conditions while not being very bulky. Owning at least a couple of these (short sleeve and long sleeve) are a must for winter riding. The only downside is that the good ones aren't cheap.
Smartly timed rest stops: Riders from Pittsburgh will be familiar with 2 time RAAM winner Danny Chew's "7 minute rule" which states that any stop made has to be less than 7 minutes long. Admittedly, for Danny this is largely about making the most of his time since he regularly rides over 200 miles per day. But keeping rest stops short and sweet can also prevent you from having to warm up a second time when you are already sweaty, so it makes sense, at least in moderately cold (30-50 degree conditions). In extremely cold and/or wet conditions through, I recommend taking a bit longer stop and letting yourself fully warm up. Make sure to strip down as much as possible without breaking any laws in order to dry out your clothes a little bit. If you stop somewhere with a hand dryer in the bathroom, these can help you dry out any wet clothing (shoes, socks and gloves in particular). Grab a hot beverage while you are stopped to help your core temperature rise a little. It still might be a rude awakening when you start up again, but you might discover that with your clothing all dried out and a cup of hot coffee in you the ride is a lot more bearable.
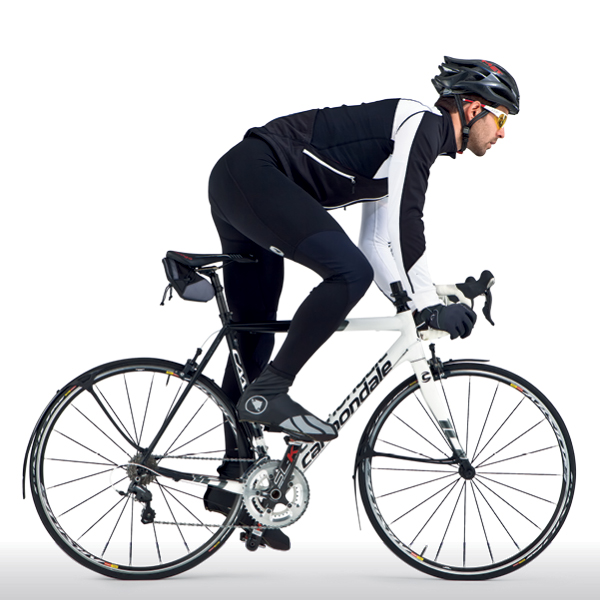
Fenders: Having fenders on your bike can keep the moisture on the ground from spraying onto your legs and up your backside as well as into the face of the person behind you. In some areas, winter group rides require riders to use at least a rear fender as a courtesy. Fenders also protect your headset and drivetrain from becoming coated in salty water sprayed up off the road, which is much more damaging to your bike than simple rain. Many cyclocross bikes and older road bikes actually have mounts for fenders. For newer road bikes, SKS makes a fender set that can easily be installed and removed. If you don't have enough clearance to accommodate these, there are also quite a few rear fenders that be easily mounted to your seatpost.
I would love to hear from you what your tips are for winter riding as I am sure that some of you do it much more regularly than I do. So write in with your tips!
Colin Sandberg is the owner and head coach of Backbone Performance, LLC. He is a Cat. 1 road racer, a USA Cycling Level II coach and a UCI Director Sportif. He is also head coach at Young Medalists High Performance and race director for Team Young Medalists. If you have questions or comments, feel free to use the comments section or email us. Thanks for reading!


